

There are so many factors that go into a hair system installation. From cleaning the scalp and system to prepping the adhesives (tape or liquid). You also need to defend your client’s scalp from outside elements that can potentially ruin the bond or application.
It can be stressful to manage and think about, especially with multiple clients. That’s why we’ve developed a simple process to help you achieve the best bond for your client. Starting with:
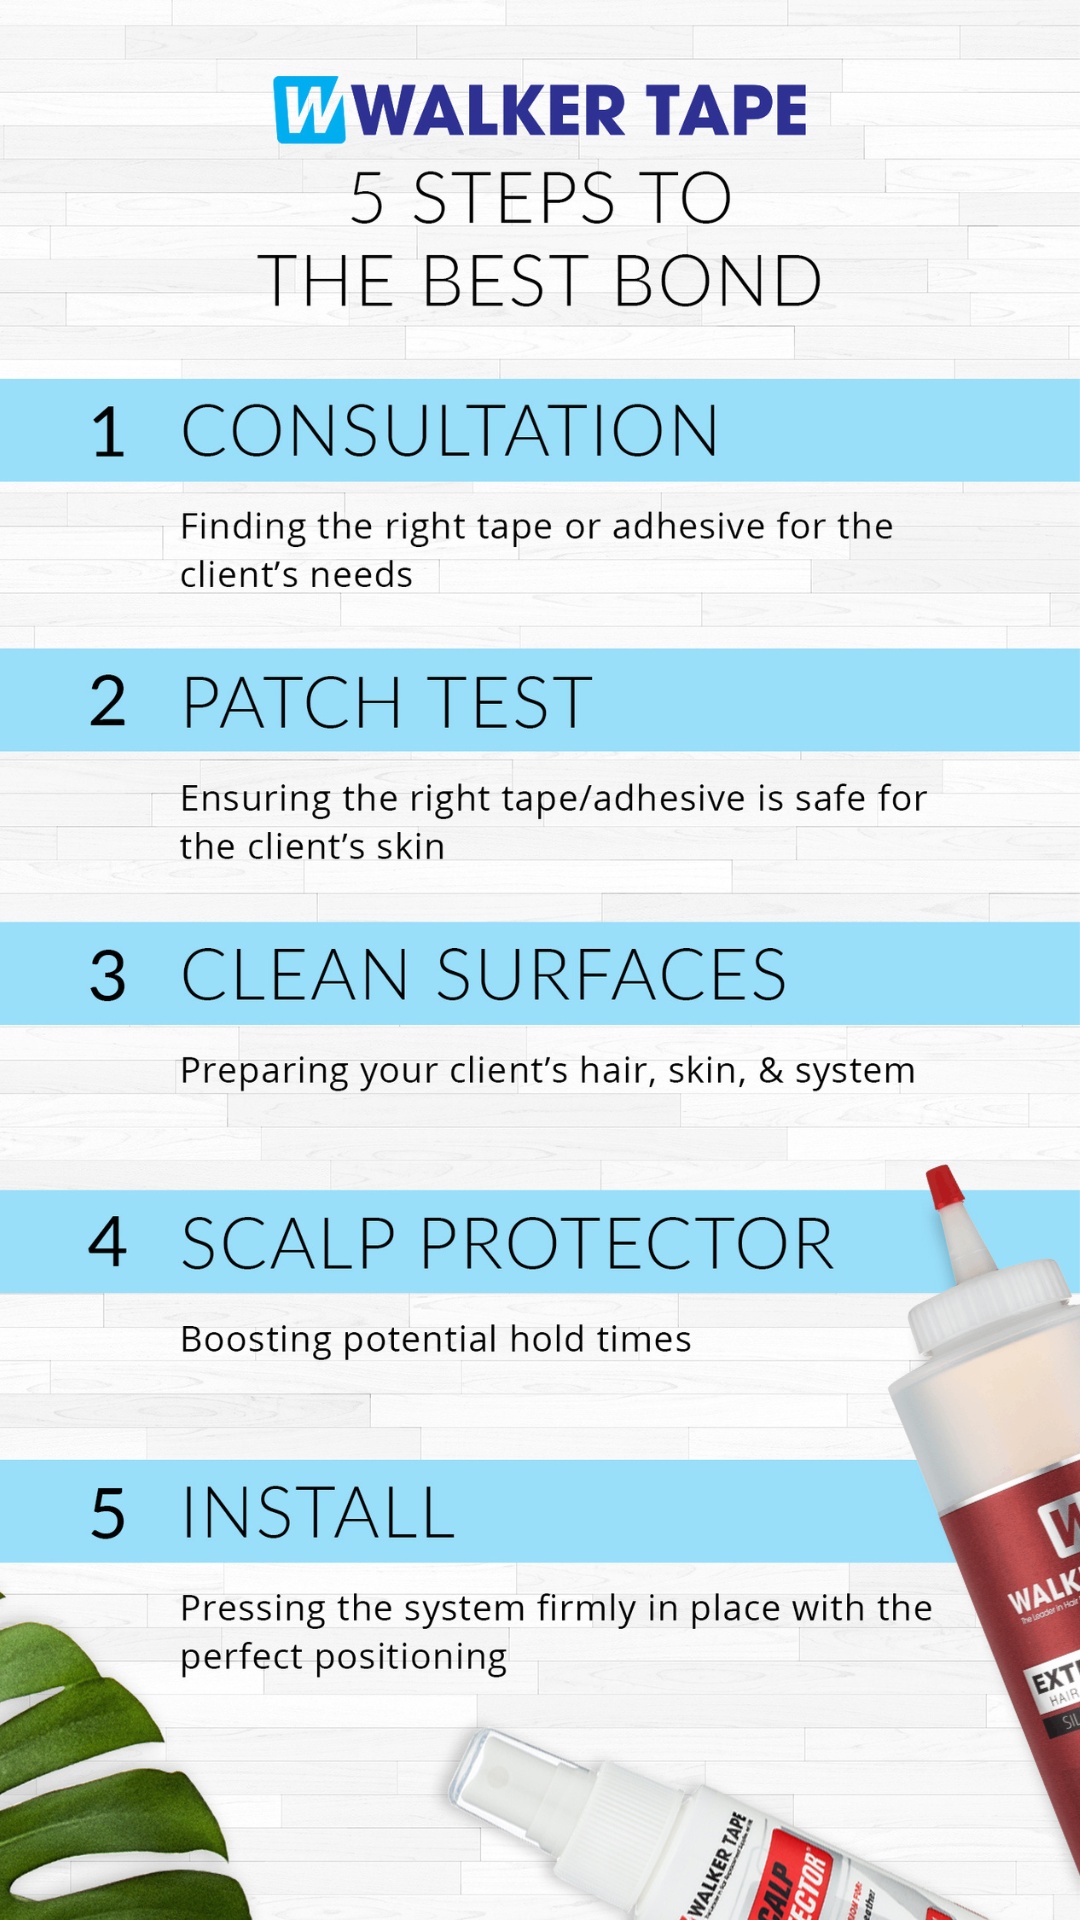
The Hair Replacement Consultation
The consultation is a fantastic opportunity to learn about your client’s lifestyle, environment, and body chemistry. These are all the factors that play a role in choosing the right tape or adhesive for that particular installation. You get to sit down with your client and learn what they are specifically looking for, and how to achieve the best bond for them.
For example, in a consultation you may learn that your client only wants their system in place for one to two weeks. With this information, you will be able to choose the best product for your clients needs. A great option is Walker Signature Sensi-Tak Select, which is our best bet for one to two week holds. It’s also low residue and hypoallergenic for an easy and comfortable wear experience.
The Patch Test
Once you’ve found the adhesive that is going to work best for your client and their situation, the next step is to perform a patch test. The patch test makes sure the product you’ve chosen interacts safely with your client’s skin and doesn’t cause any allergic reactions or irritation. This step is vital for your client’s comfort.
The patch test we recommend has three simple steps. It helps to ensure your client does not react negatively to the products you’d like to use during their install.
- Place a small amount of adhesive/tape on an area of sensitive skin. We recommend the area behind the ear.
- Put a bandage over the adhesive/tape, and send your client home for the night.
- Instruct them to remove the bandage after 24 hours and check for any reaction.
If there is any redness, irritation, or reaction, do not use that product on that client. Also, make sure to check that the bond didn’t release from the skin. If no irritation occurred and the bond has held up, you can use that product with confidence.
Cleaning All Surfaces That Affect Hold Times
There are four main surfaces that come into play during an install appointment:
First, your hands as the stylist: we always recommend wearing gloves. Gloves will protect your client’s skin from elements that can negatively affect the adhesive and its bond, such as dead skin cells and oils from your hands, dirt, surrounding products being used by other stylists, etc.
Second, your client’s bio hair: Bond Breaker Shampoo is a must when preparing your client for an install. Bond Breaker Shampoo is designed specifically to remove any traces of previous products that may linger in your client’s hair and on their scalp. For example, many conditioners contain silicone to give hair that silky feel. But silicone build-up can make it tough for an adhesive to stick.
The third and fourth surfaces go hand-in-hand; and they are your client’s skin and their hair system. Use 99% Alcohol to prep both of these surfaces. This product works by ridding oils, shed hairs, dead skin, and dust. And it’s one of the reasons why we encourage clients to have at least two systems. The perk of storing a second system is knowing that it is clean and ready to go for the next installation.
Applying Scalp Protector
Scalp protectors help shield the scalp from possible irritation by creating a microscopically thin layer of water-based acrylic on your client’s scalp. This acrylic surface is easier for our tapes and adhesives to stick to, improving potential hold times for your clients.
We have two scalp protectors to choose from that will cover all your clients’ unique circumstances:
- Scalp Protector: This is our thinnest barrier against irritation. Scalp Protector works great for clients who are active, have oily skin, or live in humid climates.
- Max Hold Sport: This is our strongest scalp protector for your active and warm weather clients. Max Hold Sport improves hold times and allows your clients to swim, shower, and work out right after their install appointment. This gives them the freedom to skip the customary 24-hour waiting period after install.
The Install
Once the scalp and system are clean, the adhesive is tacky, and your chosen scalp protector is applied, there’s just one last thing to do: apply pressure.
Give the hair system a few quick sprays of our Just-Rite Positioning Spray. How much you use will affect how long you need to apply pressure. Once finished, press the hair system firmly and securely in place on your client’s head. This step should last at least 10 seconds for both tapes and liquid adhesives in order to achieve the best bond.
Once you’re sure the system is secure and is placed properly, you are done! You have helped achieve the best bond possible for your client and their system. Become a wholesale customer today and enjoy all of our tapes and adhesives for the best possible price!

The Walker Tape® Marketing Team consists of experienced employees with a wide knowledge of hair systems, tapes, liquid adhesives, hair extensions, and hair replacement products.
The team writes and publishes trusted blogs and other resources designed to help stylists, wearers, and distributors achieve better installs, longer hold times, and more confident results.
2 Comments
Leave a Comment


I recently bought tape to replenish supplies and this time I ordered “This side to Base” tape. The problem is, is that the tape won’t stick to the base. Would the scalp protectors work if I applied them to the base?
Hmm, that’s interesting it is not sticking. I would reach out to our customer service team and they can help diagnose the problem.
Otherwise, yes. Using Scalp Protectors should help the adhesive stick longer. Also making sure to clean the base really well between uses so there are no leftover oils. Using products like 99% alcohol can help with that.